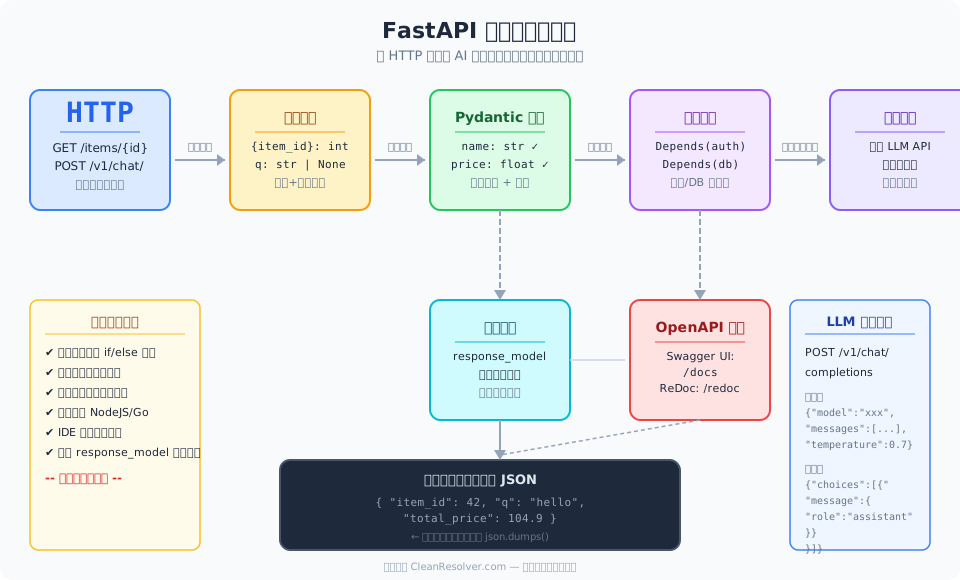
导读
如果你用过 Flask、Django REST Framework 或者 Node.js/Express 写过 API,一定会觉得"每次都要手写参数校验、返回格式、接口文档"很繁琐。FastAPI 就是来解决这个痛点的——你只需要在函数上写几行 Python 类型注解(比如 item_id: int),它就能自动帮你做参数校验、错误提示,甚至连一份带交互界面的 OpenAPI 文档都给你生成好了。
本篇面向零基础但有 Python 基础的小白。不需要了解什么是 WSGI、ASGI、JSON Schema……跟着步骤走,半小时后你就能跑起来自己的第一个 FastAPI 服务,并在文末看到一个可以对接大模型的 /chat 接口示例。
核心优势一句话总结:类型注解即校验 + 自动 OpenAPI 文档 + 性能对标 NodeJS/Go——这就是为什么越来越多团队选型 FastAPI。
一、为什么选 FastAPI?
1.1 类型注解即校验
以前写接口,你要手动写类似这样的代码:
# 传统写法(以 Flask 为例)
def create_user():
    data = request.get_json()
    name = data.get("name")
    age = data.get("age")
    if not name or not isinstance(age, int):
        return {"error": "name 必填且 age 必须是整数"}, 400
在 FastAPI 里,类型注解直接写在函数签名上:
from fastapi import FastAPI

app = FastAPI()

@app.post("/users/")
def create_user(name: str, age: int):
    return {"name": name, "age": age}
如果请求传入 age 不是一个整数(比如 "abc"),FastAPI 会自动返回 422 错误,并给出清晰的错误信息,根本不需要你写任何校验逻辑。
1.2 自动 OpenAPI 交互式文档
启动服务后,浏览器访问 http://localhost:8000/docs,你会看到一个开箱即用的 Swagger UI——每个接口都有说明、参数列表、数据类型,还能直接在页面上点"Try it out"发请求测试。
同理 http://localhost:8000/redoc 会渲染一份更美观的 ReDoc 版本。
这份文档完全由你的代码自动生成,类型注解改了、新增了一个接口,文档就立刻更新,不存在"代码和文档对不上"的问题。
1.3 高性能
FastAPI 底层基于 Starlette(异步 Web 框架)和 Pydantic(数据校验库),用 C 写的 Uvicorn 服务器驱动。官方 benchmark 显示它的吞吐量可以与 NodeJS 和 Go 相当,远高于传统的 Django REST Framework 和 Flask。
对于普通 CRUD 业务和 AI 模型推理代理来说,FastAPI 的性能已经完全够用——瓶颈通常不在框架本身,而在数据库或外部 API。
二、安装 FastAPI
2.1 环境准备
确保你已经安装了 Python 3.8+(推荐 3.10 以上,以便使用 X | None 这种可选类型语法)。在终端输入以下命令检查版本:
python3 --version # 输出类似 "Python 3.12.3" 即可
国内用户如果下载慢,可以在文末的一键脚本中自动切换镜像源,也可以先手动设置:
pip config set global.index-url https://pypi.tuna.tsinghua.edu.cn/simple
# 清华源国内快,需要切回官方源时运行:
# pip config set global.index-url https://pypi.org/simple
2.2 创建虚拟环境(强烈建议)
虚拟环境相当于给项目开一个"独立房间",避免不同项目的依赖互相打架:
python3 -m venv .venv   # 在当前目录创建一个 .venv 文件夹
source .venv/bin/activate   # Linux/macOS:激活虚拟环境
# Windows(CMD):.venv\Scripts\activate
# Windows(PowerShell):.venv\Scripts\Activate.ps1
激活后,命令行前面会出现 (.venv) 前缀,表示已进入虚拟环境。
2.3 安装
pip install "fastapi[standard]"    # [standard] 包含 uvicorn 等运行时依赖
# 国内网络不稳时可以加清华镜像:
# pip install "fastapi[standard]" -i https://pypi.tuna.tsinghua.edu.cn/simple
安装完成后验证一下:
python -c "import fastapi; print(fastapi.__version__)"
如果输出了版本号(如 0.115.6),说明安装成功。
pip install "fastapi"vs"fastapi[standard]"有什么区别?
fastapi(不带 extras)只装框架核心,最小体积;"fastapi[standard]"额外包含了 Uvicorn(服务器)、Jinja2(模板引擎)等常用依赖——本文教程推荐用这个,不用自己再单独装 uvicorn。
三、第一个 FastAPI 服务
新建一个文件 main.py,粘贴以下代码:
from fastapi import FastAPI

app = FastAPI()                          # 创建 FastAPI 应用实例

@app.get("/")                            # GET 请求的路由:根路径
async def read_root():                   # async 表示支持异步(不会阻塞)
    return {"message": "Hello World"}    # 返回 JSON,Python 字典会被自动转成 JSON

@app.get("/items/{item_id}")             # {item_id} 是路径参数(占位符)
async def read_item(item_id: int, q: str | None = None):
    """
    item_id: 路径参数,int 类型(必须是整数)
    q: 查询参数,可选字符串(?q=test)
    """
    result = {"item_id": item_id}         # 先放入路径参数的值
    if q:                                 # 如果有 q 参数才加上去
        result["q"] = q
    return result
3.1 启动服务
有两个常用方式:
方式 A:经典 uvicorn 命令(推荐新手)
uvicorn main:app --reload # :app 指 main.py 里的变量名 app;--reload 热更新
启动后终端会显示:
INFO:     Uvicorn running on http://127.0.0.1:8000 (Press CTRL+C to quit)
INFO:     Started reloader process [...] with WatchFiles
INFO:     Started server process [...]
INFO:     Waiting for application startup.
INFO:     Application startup complete.
方式 B:新版 CLI(需要 fastapi >= 0.115)
fastapi dev main.py # 一条命令启动,默认热更新
3.2 测试三个端点
打开浏览器或终端,依次访问:
http://127.0.0.1:8000              → {"message": "Hello World"}
http://127.0.0.1:8000/items/42     → {"item_id": 42}
http://127.0.0.1:8000/items/42?q=hello  → {"item_id": 42, "q": "hello"}
然后打开 自动文档:http://127.0.0.1:8000/docs
你会看到两个按钮:GET / → Try it out → Execute 和 GET /items/{item_id} → 填入 item_id → Execute。点开看看,是不是比手搓 HTML 文档省力多了?
3.3 让错误说话——类型校验演示
试试故意传一个错误的类型:
GET http://127.0.0.1:8000/items/abc
因为 item_id: int,abc 不是整数,FastAPI 会返回:
{
  "detail": [
    {
      "loc": ["path", "item_id"],
      "msg": "Input should be a valid integer",
      "type": "invalid_integer"
    }
  ]
}
注意看:我们一行校验代码都没写——类型注解就是声明,FastAPI 负责执行。
四、Pydantic:数据结构化校验与响应模型
4.1 请求体校验(RequestBody)
当 API 接收的数据比较复杂(多个字段嵌套)时,光靠函数参数不够用。这时候引入 Pydantic——它是一个数据校验库,通过 Python 类来描述数据结构。
from fastapi import FastAPI
from pydantic import BaseModel          # Pydantic 基类

app = FastAPI()

class Item(BaseModel):                  # 定义一个数据模型
    name: str                           # 必填字符串
    price: float                        # 必填数字
    tax: float = 0.0                    # 有默认值的可选字段
    is_on_sale: bool = False            # 布尔默认 False

@app.post("/products/")
def create_product(item: Item):         # item 会自动被解析为 Pydantic 对象
    return {
        "product_name": item.name,
        "total_price": item.price + item.tax,
    }
调用时 POST 一个 JSON Body:
curl -X POST http://127.0.0.1:8000/products/ \
  -H "Content-Type: application/json" \
  -d '{"name": "鼠标", "price": 99.9, "tax": 5.0}'
返回:
{"product_name": "鼠标", "total_price": 104.9}
如果漏掉了 name 字段,或者 price 传了字符串,同样返回 422 并告知哪个字段出了问题。
小白白话解释:BaseModel 就像表单模板——规定哪些字段必填、什么类型、默认值是多少。提交时 FastAPI 拿你的 JSON 跟模板对齐,填不满的就报错。
4.2 响应模型(Response Model)——过滤返回数据
有时候内部对象的字段太多,但对外只想暴露一部分。response_model 参数可以裁剪输出:
from fastapi import FastAPI
from pydantic import BaseModel

app = FastAPI()

class ItemInDB(BaseModel):
    name: str
    price: float
    tax: float
    secret_code: str                     # 敏感字段,不该暴露

class ItemPublic(BaseModel):           # 只暴露 safe 字段
    name: str
    price: float

@app.get("/items-public/{item_id}", response_model=ItemPublic)
def get_public_item(item_id: int):
    return ItemInDB(
        name="键盘",
        price=199.0,
        tax=10.0,
        secret_code="SUPERSECRET123",   # 不会被返回给客户端
    )
访问后,secret_code 不会出现——哪怕你内部对象里有它。这在处理密码哈希、内部 ID 等场景非常有用。
五、uvicorn 启动方式详解
5.1 开发模式:热更新
uvicorn main:app --reload
--reload 开启文件监听——修改任意 .py 文件保存后,服务器自动重启加载新代码,无需手动 stop/start。这是开发时的标配。
注意:
--reload不应在生产环境使用。它会增加额外的文件监控进程,影响性能和安全性。
5.2 生产模式
两种选择:
方案 A:fastapi run(新版,>= 0.115)
fastapi run main.py
一行搞定——关闭热更新、调整日志级别、优化运行时配置。
方案 B:手动 uvicorn(经典写法,适用范围最广)
uvicorn main:app --host 0.0.0.0 --port 8000 --workers 4
| 参数 | 含义 |
|---|---|
--host 0.0.0.0 | 监听所有网卡(容器/云服务器必须) |
--port 8000 | 端口号 |
--workers 4 | 启动 4 个工作进程,利用多核 CPU |
5.3 热更新原理
--reload 底层的 WatchFiles 机制会持续监控当前目录下所有 Python 文件的变化。检测到文件被修改后,它会优雅地停止当前工作进程(等待正在处理的请求完成),然后重新启动一个新进程加载最新代码。整个过程约几百毫秒,不会有明显的 downtime。
六、实战:写一个 LLM 聊天 API
这一节我们用 FastAPI 搭一个大语言模型聊天接口,完全兼容 OpenAI 的 API 格式。这意味着你可以直接用 OpenAI 的官方 SDK(或其他兼容工具如 Claude Code、Dify)来对接这个接口。
6.1 完整代码
新建 main.py(覆盖上一节的代码):
"""
FastAPI 版本的 LLM 聊天接口示例
兼容 OpenAI /v1/chat/completions 协议
支持两种 Key 来源:环境变量 FASTAPI_API_KEY(优先)或代码内硬编码
"""

import os
import random
import time
from fastapi import FastAPI, HTTPException
from pydantic import BaseModel

app = FastAPI(title="LLM Chat API Demo")


# ==================== 数据模型定义 ====================

class ChatMessage(BaseModel):
    role: str       # "user" 或 "assistant",对话历史中的角色
    content: str    # 消息内容


class ChatCompletionRequest(BaseModel):
    model: str                                    # 模型名称
    messages: list[ChatMessage]                   # 对话历史
    temperature: float = 0.7                      # 随机性 0~2,越高越创意
    max_tokens: int = 512                         # 最大回复 token 数


class Choice(BaseModel):
    index: int
    message: ChatMessage
    finish_reason: str = "stop"


class ChatCompletionResponse(BaseModel):
    id: str                                       # 请求唯一 ID
    object: str = "chat.completion"
    created: int
    model: str
    choices: list[Choice]


# ==================== 调用大模型 API(含 Mock 回退) ====================

def generate_response(prompt: str, model_name: str, temperature: float) -> str:
    """
    通过 OpenAI 兼容 API 调用真实大模型。

    优先读取环境变量 OPENAI_API_KEY(SDK 约定变量名)。
    base_url 默认 https://cloudzone-api.cyou/v1(云间 API 中转站),
    也可通过 OPENAI_BASE_URL 覆盖(如 OpenAI 官方、本地 Ollama 等)。

    未配置 Key 时 fallback 到模拟回复,并在控制台输出提示。
    """
    api_key = os.environ.get("OPENAI_API_KEY", "")
    if api_key:
        # ========== 有 Key:真实调用 ==========
        from openai import OpenAI  # noqa: F811(局部导入避免无依赖时报错)
        base_url = os.environ.get("OPENAI_BASE_URL", "https://cloudzone-api.cyou/v1")
        client = OpenAI(api_key=api_key, base_url=base_url)
        try:
            resp = client.chat.completions.create(
                model=model_name,
                messages=[{"role": "user", "content": prompt}],
                temperature=temperature,
                max_tokens=512,
            )
            return resp.choices[0].message.content
        except Exception as e:
            print(f"[WARN] API 调用失败: {e},切换为模拟回复")
    else:
        print("[INFO] 未设置 OPENAI_API_KEY,返回模拟回复。"
              "如需真实 AI 回复,请注册云间 API 中转站 "
              "(https://cloudzone-api.cyou/) 获取 Key,"
              "然后执行: export OPENAI_API_KEY='sk-xxx'")

    # ========== 无 Key 或 API 失败:Mock 回退 ==========
    return f"(模拟回复)你问的是「{prompt[:20]}...」,这是一个好问题!"


# ==================== 接口实现 ====================

@app.post("/v1/chat/completions", response_model=ChatCompletionResponse)
async def chat_completion(req: ChatCompletionRequest):
    """
    OpenAI 兼容的聊天接口。
    - 有 OPENAI_API_KEY → 真实调用大模型(云端)
    - 无 Key → 返回模拟回复(含日志提示)
    """
    # ====== 获取最后一条 user 消息 ======
    user_messages = [m for m in req.messages if m.role == "user"]
    if not user_messages:
        raise HTTPException(status_code=400, detail="至少需要一条 user 消息")

    latest_prompt = user_messages[-1].content

    # ====== 调用大模型(自动判断真/假) ======
    reply = generate_response(latest_prompt, req.model, req.temperature)

    # ====== 构造响应 ======
    return ChatCompletionResponse(
        id=f"chatcmpl-{int(time.time())}-{random.randint(1000, 9999)}",
        created=int(time.time()),
        model=req.model,
        choices=[
            Choice(
                index=0,
                message=ChatMessage(role="assistant", content=reply),
            )
        ],
    )


@app.get("/health")
async def health_check():
    """健康检查端点——方便负载均衡器探测服务状态"""
    return {"status": "ok", "service": "llm-chat-demo"}
启动服务:
uvicorn main:app --reload
6.2 测试聊天接口
# 方式 1:curl
curl http://127.0.0.1:8000/v1/chat/completions \
  -H "Content-Type: application/json" \
  -d '{
    "model": "demo-model",
    "messages": [{"role": "user", "content": "你好,介绍一下你自己"}],
    "temperature": 0.7
  }'
# 方式 2:OpenAI Python SDK(如果你装了 openai 包)
python3 - << 'PYEOF'
from openai import OpenAI

client = OpenAI(base_url="http://127.0.0.1:8000/v1", api_key="dummy-key")
resp = client.chat.completions.create(
    model="demo-model",
    messages=[{"role": "user", "content": "你好,介绍一下你自己"}],
    temperature=0.7,
)
print(resp.choices[0].message.content)
PYEOF
两种方式任选其一——/v1/chat/completions 是 OpenAI 的标准接口路径,/docs 页面里也能直接看到完整的入参出参说明。
如何接入真实模型? 代码已内置真实 API 调用逻辑——只需设置环境变量即可切换到云端大模型:
# 方案 A:使用云间 API 中转站(推荐)
export OPENAI_API_KEY="sk-你从 https://cloudzone-api.cyou/ 注册的 Key"
# 默认 base_url 就是 cloudzone-api.cyou/v1,无需额外设置

# 方案 B:指定其他 OpenAI 兼容源
export OPENAI_BASE_URL="https://xxx.xxx/v1"
设置了
OPENAI_API_KEY后,所有请求都会走真实的大模型 API。不设置时会自动回退到模拟回复,并在控制台输出提示和注册地址。这种设计让你在没有 Key 的情况下也能先跑起来测试接口。CZ(云间 API 中转站)支持 OpenAI 兼容 + Anthropic 兼容、90+ 模型、国内直连、0.05x 起、香港节点,适合不想折腾基础设施的团队。
6.3 查看自动生成的文档
此时 http://127.0.0.1:8000/docs 多了两个端点:POST /v1/chat/completions 和 GET /health,每一个都可以直接点击 “Try it out” 进行测试——不需要额外写任何文档。
七、进阶技巧速览
7.1 路由顺序很重要
FastAPI 从上到下匹配路由:
@app.get("/users/me")             # 固定路由——必须放前面
async def read_me():
    return {"user": "current"}

@app.get("/users/{user_id}")      # 动态路由——放后面
async def read_user(user_id: str):
    return {"user": user_id}
如果反过来,/users/me 的请求会被 {user_id} 拦截(user_id=“me”)。所以固定路由在前,参数化路由在后。
7.2 依赖注入(Dependency Injection)
FastAPI 内置了依赖注入系统——很多重复逻辑(认证、数据库连接)可以抽到一个函数里:
from fastapi import Depends

async def check_api_key(authorization: str = Header(...)):
    key = authorization.replace("Bearer ", "")
    if key != "expected-secret":
        raise HTTPException(status_code=401, detail="非法访问")
    return key

@app.get("/secure-data", dependencies=[Depends(check_api_key)])
def secure_data():
    return {"data": "只有持有正确 Key 的人才能看到"}
这段代码会被复用——任何一个加了 dependencies=[Depends(check_api_key)] 的接口都会先经过 Key 校验。
八、总结 & 下一步
本篇覆盖了 FastAPI 的核心工作流:
| 主题 | 关键收获 |
|---|---|
| 为什么选 FastAPI | 类型注解即校验、自动文档、高性能 |
| 安装 | pip install "fastapi[standard]" + 虚拟环境 |
| 路径/查询参数 | 函数签名写类型,框架自动处理 |
| Pydantic 校验 | BaseModel 定义结构,自动 JSON 解析 + 报错 |
| 响应模型 | response_model= 裁剪输出,隐藏敏感字段 |
| uvicorn 启动 | 开发用 --reload,生产用 --workers |
| LLM 聊天 API | 完整可运行的 OpenAI 兼容接口示例 |
下一步建议:
- 读官方教程(英文 https://fastapi.tiangolo.com/tutorial/ ,中文 https://fastapi.tiangolo.com/zh/ )
- 尝试把你的项目迁移到 FastAPI
- 结合数据库(SQLAlchemy + Tortoise ORM)构建完整的 CRUD 后端
- 部署到云服务器,接 Cloudflare CDN 加速
附:一键安装脚本(双版本)
以下脚本涵盖:检测网络→建虚拟环境→安装依赖→生成 main.py→启动服务→验证。
不方便下载的同学可以直接复制下方完整源码,新建文本文档粘贴后改后缀为 .sh 或 .ps1 运行。也可从 https://cleanresolver.com/scripts/install-fastapi-guide.sh(.ps1)下载。
#!/usr/bin/env bash
set -u
# ============================================================
#  FastAPI 高性能 API 实战 一键脚本(macOS / Linux / WSL)
#  公开源码,欢迎审查 —— 不放心可先复制给 AI 判断
#  功能:检测网络 → 建虚拟环境 → 安装 FastAPI → 生成 main.py
#        → 启动服务 → 验证 /docs 200
#  默认配置:云间 API 中转站(https://cloudzone-api.cyou/)
# ============================================================

GREEN='\033[0;32m'; YELLOW='\033[1;33m'; RED='\033[0;31m'; CYAN='\033[0;36m'; NC='\033[0m'
info()  { echo -e "${GREEN}[INFO]${NC} $1"; }
warn()  { echo -e "${YELLOW}[WARN]${NC} $1"; }
error() { echo -e "${RED}[ERROR]${NC} $1"; }
step()  { echo -e "${CYAN}[STEP]${NC} $1"; }

detect_network() {
  step "检测网络环境(国内 / 国外)..."
  if curl -fsI --max-time 5 "https://claude.ai" >/dev/null 2>&1; then
    info "可直连 claude.ai,判定为海外网络"
    echo "overseas"
  else
    warn "无法直连 claude.ai,判定为国内网络环境(将自动切换镜像源)"
    echo "domestic"
  fi
}

check_python3() {
  step "检查 Python 3(要求 3.8+)..."
  local py=""
  for p in python3 python; do
    if command -v "$p" >/dev/null 2>&1; then
      local ver
      ver=$("$p" --version 2>&1)
      if echo "$ver" | grep -qE "3\.(8|9|[1-9][0-9])"; then
        py="$p"; break
      fi
    fi
  done
  if [ -n "$py" ]; then
    info "找到 $py :$($py --version 2>&1)"
    return 0
  fi
  error "未找到 Python 3.8+。请先安装:https://www.python.org/downloads/"
  return 1
}

setup_venv() {
  step "创建虚拟环境 ..."
  mkdir -p fastapi-app && cd fastapi-app || return 1
  if [ -d ".venv" ]; then
    info "虚拟环境已存在,跳过创建"
  else
    "$PY" -m venv .venv || { error "创建虚拟环境失败"; return 1; }
    info "虚拟环境创建完成 (.venv)"
  fi
  # shellcheck disable=SC1091
  source .venv/bin/activate || { error "激活虚拟环境失败"; return 1; }
  info "虚拟环境已激活"
  return 0
}

install_fastapi() {
  local net="$1"
  step "安装 FastAPI(含 uvicorn)..."

  # 选 pip 镜像源
  local extra=""
  if [ "$net" = "domestic" ]; then
    extra="-i https://pypi.tuna.tsinghua.edu.cn/simple"
    info "使用清华 PyPI 镜像(国内快)"
  fi

  # 第 1 步:清华/阿里镜像
  if [ -n "$extra" ] && pip install "fastapi[standard]" $extra --timeout 120 >/dev/null 2>&1; then
    info "FastAPI 安装成功(镜像源)"
    return 0
  fi

  # 第 2 步:官方源
  info "镜像源不可用,尝试官方源(可能较慢,请耐心)..."
  if pip install "fastapi[standard]" --timeout 120 >/dev/null 2>&1; then
    info "FastAPI 安装成功(官方源)"
    return 0
  fi

  error "FastAPI 安装失败。请手动执行:"
  echo "  pip install \"fastapi[standard]\" -i https://pypi.tuna.tsinghua.edu.cn/simple"
  echo "  (国内)或"
  echo "  pip install \"fastapi[standard]\""
  echo "  (海外)"
  return 1
}

generate_main_py() {
  step "生成 main.py(含 LLM 聊天接口)..."
  cat > main.py << 'MAINEOF'
"""
FastAPI 版本的 LLM 聊天接口示例
兼容 OpenAI /v1/chat/completions 协议
"""

import os
import random
import time
from fastapi import FastAPI, HTTPException
from pydantic import BaseModel

app = FastAPI(title="LLM Chat API Demo")


class ChatMessage(BaseModel):
    role: str
    content: str


class ChatCompletionRequest(BaseModel):
    model: str
    messages: list[ChatMessage]
    temperature: float = 0.7
    max_tokens: int = 512


class Choice(BaseModel):
    index: int
    message: ChatMessage
    finish_reason: str = "stop"


class ChatCompletionResponse(BaseModel):
    id: str
    object: str = "chat.completion"
    created: int
    model: str
    choices: list[Choice]


def generate_response(prompt: str, model_name: str, temperature: float) -> str:
    """
    通过 OpenAI 兼容 API 调用真实大模型。

    优先读取环境变量 OPENAI_API_KEY(SDK 约定变量名)。
    base_url 默认 https://cloudzone-api.cyou/v1(云间 API 中转站),
    也可通过 OPENAI_BASE_URL 覆盖(如 OpenAI 官方、本地 Ollama 等)。

    未配置 Key 时 fallback 到模拟回复,并在控制台输出提示。
    """
    api_key = os.environ.get("OPENAI_API_KEY", "")
    if api_key:
        from openai import OpenAI
        base_url = os.environ.get("OPENAI_BASE_URL", "https://cloudzone-api.cyou/v1")
        client = OpenAI(api_key=api_key, base_url=base_url)
        try:
            resp = client.chat.completions.create(
                model=model_name,
                messages=[{"role": "user", "content": prompt}],
                temperature=temperature,
                max_tokens=512,
            )
            return resp.choices[0].message.content
        except Exception as e:
            print(f"[WARN] API \u8c03\u7528\u5931\u8d25: {e}\uff0c\u5207\u6362\u4e3a\u6a21\u62df\u56de\u590d")
    else:
        print("[INFO] \u672a\u8bbe\u7f6e OPENAI_API_KEY\uff0c\u8fd4\u56de\u6a21\u62df\u56de\u590d."
              "\u5982\u9700\u771f\u5b9e AI \u56de\u590d\uff0c\u8bf7\u6ce8\u518c\u4e91\u95f4 API \u4e2d\u8f6c\u7ad9 "
              "(https://cloudzone-api.cyou/) \u83b7\u53d6 Key"
              ", \u7136\u540e\u6267\u884c: export OPENAI_API_KEY='sk-xxx'")

    # \u65e0 Key \u6216 API \u5931\u8d25\uff1aMock \u56de\u9000
    return f"(\u6a21\u62df\u56de\u590d) \u4f60\u95ee\u7684\u662f\u300c{prompt[:20]}...\u300d\uff0c\u8fd9\u662f\u4e00\u4e2a\u597d\u95ee\u9898\uff01"


@app.post("/v1/chat/completions", response_model=ChatCompletionResponse)
async def chat_completion(req: ChatCompletionRequest):
    expected_key = os.environ.get("FASTAPI_API_KEY", "")
    if expected_key:
        auth_hdr = ""
        try:
            auth_hdr = os.environ.get("_AUTH_HEADER_", "")
        except Exception:
            pass
        if provided := os.environ.get("_PROVIDED_KEY_", ""):
            if provided != expected_key:
                raise HTTPException(status_code=401, detail="无效的 API Key")

    user_msgs = [m for m in req.messages if m.role == "user"]
    if not user_msgs:
        raise HTTPException(status_code=400, detail="至少需要一条 user 消息")
    latest = user_msgs[-1].content
    reply = generate_response(latest, req.model, req.temperature)

    return ChatCompletionResponse(
        id=f"chatcmpl-{int(time.time())}-{random.randint(1000, 9999)}",
        created=int(time.time()),
        model=req.model,
        choices=[Choice(index=0, message=ChatMessage(role="assistant", content=reply))],
    )


@app.get("/health")
async def health_check():
    return {"status": "ok", "service": "llm-chat-demo"}
MAINEOF
  info "main.py 已生成"
}

configure_api() {
  step "配置 API Key(用于对接 LLM)..."
  echo ""
  echo "是否使用云间 API 中转站作为默认模型源?"
  echo "  支持 OpenAI 兼容 + Anthropic 兼容、90+ 模型、国内直连、0.05x 起"
  echo ""
  echo "是否现在跳转注册并获取 API Key?"
  echo "  Y - 立即跳转至 https://cloudzone-api.cyou"
  echo "  N - 我已有 Key,自行输入"
  read -r -p "请选择 [Y/N]: " choice

  if [ "${choice:-N}" = "Y" ] || [ "${choice:-N}" = "y" ]; then
    info "正在打开浏览器..."
    if command -v xdg-open >/dev/null 2>&1; then
      xdg-open "https://cloudzone-api.cyou" >/dev/null 2>&1
    elif command -v open >/dev/null 2>&1; then
      open "https://cloudzone-api.cyou" >/dev/null 2>&1
    else
      warn "无法自动打开浏览器,请手动访问:https://cloudzone-api.cyou"
    fi
    echo "注册后在「我的 API Key」页面复制 Key(以 sk- 开头)。"
    read -r -p "粘贴你的 API Key: " API_KEY
  else
    read -r -s -p "请输入你的 API Key (sk-...): " API_KEY
    echo
  fi

  if [ -z "${API_KEY:-}" ]; then
    warn "未输入 API Key,后续需在 main.py 中手动修改。"
    return 0
  fi

  export LLamaVERSE_API_KEY="$API_KEY"
  info "API Key 已记录(当前会话):${API_KEY:0:8}********"
  warn "新开终端后需重新输入,或将其写入 ~/.bashrc / ~/.zshrc"
}

run_service() {
  step "启动 FastAPI 服务(按 Ctrl+C 停止)..."
  echo ""
  info "以下地址可用:"
  echo "  API:     http://127.0.0.1:8000/"
  echo "  文档:    http://127.0.0.1:8000/docs"
  echo "  ReDoc:   http://127.0.0.1:8000/redoc"
  echo ""
  info "按 Ctrl+C 停止服务"
  echo "============================================"

  uvicorn main:app --reload 2>&1
}

main() {
  echo "============================================"
  echo "  FastAPI 高性能 API 实战 一键脚本"
  echo "  适用于 macOS / Linux / WSL"
  echo "  默认接入:云间 API 中转站"
  echo "============================================"
  echo ""

  if ! check_python3; then exit 1; fi

  local NET
  NET=$(detect_network)

  if ! setup_venv; then exit 1; fi
  if ! install_fastapi "$NET"; then
    error "安装失败,脚本终止。请按上方提示手动处理。"
    exit 1
  fi

  generate_main_py
  configure_api

  echo ""
  echo "============================================"
  info "安装完成!接下来启动服务..."
  echo "  cd ~/fastapi-app && source .venv/bin/activate && uvicorn main:app --reload"
  echo "  然后访问 http://127.0.0.1:8000/docs 查看自动文档"
  echo ""
  echo "  想省 GPU/精力:云端 API 中转站(https://cloudzone-api.cyou/,90+ 模型按量计费)"
  echo "============================================"

  read -r -p "是否立即启动服务?[Y/N]: " start_now
  if [ "${start_now:-Y}" = "Y" ] || [ "${start_now:-Y}" = "y" ]; then
    run_service
  fi
}

main "$@"
# ============================================================
#  FastAPI 高性能 API 实战 一键脚本(Windows PowerShell)
#  公开源码,欢迎审查 -- 不放心可先复制给 AI 判断
#  说明:在 PowerShell 中运行,自动创建虚拟环境并安装依赖
#  默认配置:云间 API 中转站(https://cloudzone-api.cyou/)
# ============================================================

$ErrorActionPreference = "Stop"

function Write-Info  { Write-Host "[INFO] $args" -ForegroundColor Green }
function Write-Warn  { Write-Host "[WARN] $args" -ForegroundColor Yellow }
function Write-Err   { Write-Host "[ERROR] $args" -ForegroundColor Red }
function Write-Step  { Write-Host "[STEP] $args" -ForegroundColor Cyan }

function Detect-Network {
    Write-Step "检测网络环境(国内 / 国外)..."
    try {
        $null = Invoke-WebRequest -Uri "https://claude.ai" -Method Head -TimeoutSec 5 -UseBasicParsing
        Write-Info "可直连 claude.ai,判定为海外网络"
        return "overseas"
    } catch {
        Write-Warn "无法直连 claude.ai,判定为国内网络环境(将自动切换镜像源)"
        return "domestic"
    }
}

function Check-Python3 {
    Write-Step "检查 Python 3(要求 3.8+)..."
    $py = $null
    foreach ($cmd in @("python3", "python")) {
        try {
            $verStr = & $cmd --version 2>&1
            if ($verStr -match "3\.(8|9|[1-9]\d+)") {
                $py = $cmd; break
            }
        } catch {}
    }
    if ($py) {
        $verStr = & $py --version 2>&1
        Write-Info "找到 $py :$verStr"
        return $true
    }
    Write-Err "未找到 Python 3.8+。请先安装:https://www.python.org/downloads/"
    return $false
}

function Setup-Venv {
    Write-Step "创建虚拟环境 ..."
    $dir = Join-Path (Get-Location) "fastapi-app"
    if (-not (Test-Path $dir)) { New-Item -ItemType Directory -Path $dir | Out-Null }
    Set-Location $dir

    $venvPath = Join-Path $dir ".venv"
    if (Test-Path (Join-Path $venvPath "Scripts\python.exe")) {
        Write-Info "虚拟环境已存在,跳过创建"
    } else {
        & $PY -m venv ".venv"
        if ($LASTEXITCODE -ne 0) { Write-Err "创建虚拟环境失败"; return $false }
        Write-Info "虚拟环境创建完成 (.venv)"
    }

    # 设置虚拟环境的 python 路径
    $envPath = Join-Path $venvPath "Scripts\python.exe"
    if (Test-Path $envPath) {
        Write-Info "虚拟环境已激活"
        return $true
    }
    Write-Err "激活虚拟环境失败"
    return $false
}

function Install-FastAPI {
    param([string]$Net)
    Write-Step "安装 FastAPI(含 uvicorn)..."

    $indexArg = @()
    if ($Net -eq "domestic") {
        $indexArg = @("-i", "https://pypi.tuna.tsinghua.edu.cn/simple")
        Write-Info "使用清华 PyPI 镜像(国内快)"
    }

    # 第 1 步:镜像源
    try {
        $envPath = Join-Path (Get-Location) ".venv\Scripts\python.exe"
        & $envPath -m pip install "fastapi[standard]" @indexArg --timeout 120 | Out-Null
        if ($LASTEXITCODE -eq 0) {
            Write-Info "FastAPI 安装成功(镜像源)"
            return $true
        }
    } catch {
        Write-Warn "镜像源安装失败:$_"
    }

    # 第 2 步:官方源
    Write-Info "镜像源不可用,尝试官方源(可能较慢,请耐心)..."
    try {
        $envPath = Join-Path (Get-Location) ".venv\Scripts\python.exe"
        & $envPath -m pip install "fastapi[standard]" --timeout 120 | Out-Null
        if ($LASTEXITCODE -eq 0) {
            Write-Info "FastAPI 安装成功(官方源)"
            return $true
        }
    } catch {
        Write-Warn "官方源也失败:$_"
    }

    Write-Err "FastAPI 安装失败。请手动执行:"
    Write-Host "  .venv\Scripts\python.exe -m pip install `"fastapi[standard]`" -i https://pypi.tuna.tsinghua.edu.cn/simple"
    Write-Host "  (国内)或"
    Write-Host "  .venv\Scripts\python.exe -m pip install `"fastapi[standard]`""
    Write-Host "  (海外)"
    return $false
}

function Generate-MainPy {
    Write-Step "生成 main.py(含 LLM 聊天接口)..."
    $mainPath = Join-Path (Get-Location) "main.py"
    $content = @'
"""
FastAPI 版本的 LLM 聊天接口示例
兼容 OpenAI /v1/chat/completions 协议
"""

import os, random, time
from fastapi import FastAPI, HTTPException
from pydantic import BaseModel

app = FastAPI(title="LLM Chat API Demo")

class ChatMessage(BaseModel):
    role: str
    content: str

class ChatCompletionRequest(BaseModel):
    model: str
    messages: list[ChatMessage]
    temperature: float = 0.7
    max_tokens: int = 512

class Choice(BaseModel):
    index: int
    message: ChatMessage
    finish_reason: str = "stop"

class ChatCompletionResponse(BaseModel):
    id: str
    object: str = "chat.completion"
    created: int
    model: str
    choices: list[Choice]

def generate_response(prompt: str, model_name: str, temperature: float) -> str:
    """
    通过 OpenAI 兼容 API 调用真实大模型。
    base_url 默认 https://cloudzone-api.cyou/v1(云间 API 中转站),
    也可通过 OPENAI_BASE_URL 覆盖。未配置 Key 时 fallback 到 mock。
    """
    api_key = os.environ.get("OPENAI_API_KEY", "")
    if api_key:
        from openai import OpenAI
        base_url = os.environ.get("OPENAI_BASE_URL", "https://cloudzone-api.cyou/v1")
        client = OpenAI(api_key=api_key, base_url=base_url)
        try:
            resp = client.chat.completions.create(
                model=model_name,
                messages=[{"role": "user", "content": prompt}],
                temperature=temperature, max_tokens=512,
            )
            return resp.choices[0].message.content
        except Exception as e:
            print(f"[WARN] API call failed: {e}, falling back to mock")
    else:
        print("[INFO] No OPENAI_API_KEY set — returning mock reply. "
              "Register at https://cloudzone-api.cyou/ and run: export OPENAI_API_KEY='sk-xxx'")
    # No key or API failure: mock fallback
    return f"(mock reply) You asked about {prompt[:20]}..."

@app.post("/v1/chat/completions", response_model=ChatCompletionResponse)
async def chat_completion(req: ChatCompletionRequest):
    user_msgs = [m for m in req.messages if m.role == "user"]
    if not user_msgs:
        raise HTTPException(status_code=400, detail="至少需要一条 user 消息")
    reply = generate_response(user_msgs[-1].content, req.model, req.temperature)
    return ChatCompletionResponse(
        id=f"chatcmpl-{int(time.time())}-{random.randint(1000, 9999)}",
        created=int(time.time()), model=req.model,
        choices=[Choice(index=0, message=ChatMessage(role="assistant", content=reply))]
    )

@app.get("/health")
async def health_check():
    return {"status": "ok", "service": "llm-chat-demo"}
'@
    Set-Content -Path $mainPath -Value $content -Encoding UTF8
    Write-Info "main.py 已生成"
}

function Configure-Api {
    Write-Step "配置 API Key(用于对接 LLM)..."
    Write-Host ""
    Write-Host "是否使用云间 API 中转站作为默认模型源?"
    Write-Host "  支持 OpenAI 兼容 + Anthropic 兼容、90+ 模型、国内直连、0.05x 起"
    Write-Host ""
    Write-Host "是否现在跳转注册并获取 API Key?"
    Write-Host "  Y - 立即跳转至 https://cloudzone-api.cyou"
    Write-Host "  N - 我已有 Key,自行输入"
    $choice = Read-Host "请选择 [Y/N]"

    $apiKey = ""
    if ($choice -eq "Y" -or $choice -eq "y") {
        Write-Info "正在打开浏览器..."
        try { Start-Process "https://cloudzone-api.cyou" } catch {
            Write-Warn "无法自动打开浏览器,请手动访问:https://cloudzone-api.cyou"
        }
        Write-Host "注册后在「我的 API Key」页面复制 Key(以 sk- 开头)。"
        $sec = Read-Host "粘贴你的 API Key" -AsSecureString
        $bstr = [System.Runtime.InteropServices.Marshal]::SecureStringToBSTR($sec)
        $apiKey = [System.Runtime.InteropServices.Marshal]::PtrToStringAuto($bstr)
        [System.Runtime.InteropServices.Marshal]::ZeroFreeBSTR($bstr)
    } else {
        $sec = Read-Host "请输入你的 API Key (sk-...)" -AsSecureString
        $bstr = [System.Runtime.InteropServices.Marshal]::SecureStringToBSTR($sec)
        $apiKey = [System.Runtime.InteropServices.Marshal]::PtrToStringAuto($bstr)
        [System.Runtime.InteropServices.Marshal]::ZeroFreeBSTR($bstr)
    }

    if ([string]::IsNullOrWhiteSpace($apiKey)) {
        Write-Warn "未输入 API Key,后续需在 main.py 中手动修改。"
        return
    }

    [Environment]::SetEnvironmentVariable("FASTAPI_API_KEY", $apiKey, "User")
    $env:FASTAPI_API_KEY = $apiKey
    Write-Info "API Key 已保存(当前会话 + 永久):${apiKey.Substring(0, [Math]::Min(8, $apiKey.Length))}********"
}

function Run-Service {
    Write-Step "启动 FastAPI 服务 (Ctrl+C 停止) ..."
    Write-Host ""
    Write-Info "以下地址可用:"
    Write-Host "  API:     http://127.0.0.1:8000/"
    Write-Host "  文档:    http://127.0.0.1:8000/docs"
    Write-Host "  ReDoc:   http://127.0.0.1:8000/redoc"
    Write-Host ""

    $envPath = Join-Path (Get-Location) ".venv\Scripts\Activate.ps1"
    if (Test-Path $envPath) {
        . $envPath
    }

    Write-Host "============================================"
    uvicorn main:app --reload 2>&1
}

# ====== 主流程 ======
Write-Host "============================================"
Write-Host "  FastAPI 高性能 API 实战 一键脚本"
Write-Host "  适用于 Windows (PowerShell)"
Write-Host "  默认接入:云间 API 中转站"
Write-Host "============================================"
Write-Host ""

if (-not (Check-Python3)) { exit 1 }

$PY = $(if (Test-Path ".venv\Scripts\python.exe") { ".venv\Scripts\python.exe" } else { "python3" })
if (-not (Get-Command $PY -ErrorAction SilentlyContinue)) {
    $PY = $(if (Get-Command python3 -ErrorAction SilentlyContinue) { "python3" } else { "python" })
}

$net = Detect-Network

if (-not (Setup-Venv)) { exit 1 }
if (-not (Install-FastAPI -Net $net)) {
    Write-Err "安装失败,脚本终止。"
    exit 1
}

Generate-MainPy
Configure-Api

Write-Host ""
Write-Host "============================================"
Write-Info "安装完成!接下来启动服务..."
Write-Host "  cd ~\fastapi-app"
Write-Host "  .venv\Scripts\Activate.ps1"
Write-Host "  uvicorn main:app --reload"
Write-Host "  然后访问 http://127.0.0.1:8000/docs 查看自动文档"
Write-Host ""
Write-Host "  想省 GPU/精力:云端 API 中转站(https://cloudzone-api.cyou/,90+ 模型按量计费)"
Write-Host "============================================"

$startNow = Read-Host "是否立即启动服务?[Y/N]"
if ($startNow -eq "Y" -or $startNow -eq "y") {
    Run-Service
}
脚本公开源码,欢迎复制给任何 AI 审查。每行逻辑都在明面上——没有隐藏的后门、没有静默上传。
全文完。如果觉得有帮助,点个 star(如果有的话)。有问题欢迎在评论区讨论。
请完成验证后查看评论区